
XInput Mode Tutorial
Before the release of Reality Runner V2 and the Reality Runner Application, Reality Runner operated as an emulated Xbox Controller, also known as an XInput device. After the update, the Reality Runner is designed to work with the Reality Runner Application & SteamVR Driver by default, but you can still access the previous mode of operation, now known as “XInput Mode”, using this guide.
In addition to XInput Mode, we offer a very similar feature, known as Virtual Gamepad Mode. You can easily emulate an Xbox Controller, and even merge the inputs on a real Xbox controller with your Reality Runner, using this mode. You can find more details in the Reality Runner Application documentation.
You may still want to use XInput Mode for the following reasons:
You are concerned about ViGEmBus or HID Hide (used by Virtual Gamepad Mode) triggering anti-cheat
You don’t want to use the Reality Runner Application
If either of these apply, this is the guide for you.
Switching to XInput Mode
As of Firmware update 3.0.0, your Reality Runner Device will boot into Reality Runner Application (“RR App”) Mode by default. If you want to it to boot into XINPUT mode just once (and then go back to RR App Mode on the next restart), you need to set your Current Gamepad Mode to XINPUT. If you want it to boot into XINPUT mode from by default each time, you should also set your Default Gamepad Mode to XINPUT.
There are 3 different ways to do this; in the Web UI, in the Reality Runner Application, or using the V2 OLED Screen. Default mode can only be changed via the Web UI and V2 OLED screen.
XInput Mode in the WebUI
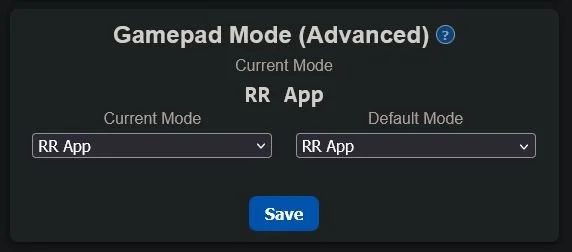
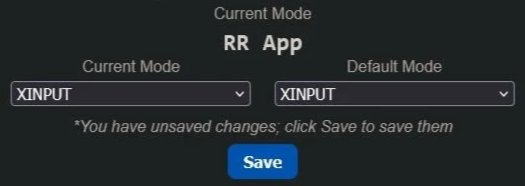
The best place to change your Gamepad Mode is in the Web UI (rrsensor.local). To do so, scroll to the bottom, where you’ll see a “Gamepad Mode (Advanced)” section.
To boot into XINPUT mode once, set “Current Mode” to XINPUT, and click Save. The second time you restart your device, it will return to RR App Mode, and your Reality Runner Application will once again connect to the device.
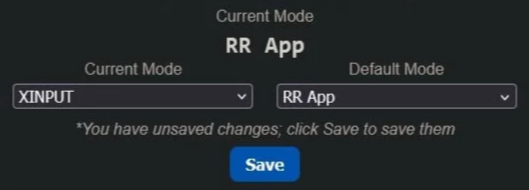
To boot into XINPUT mode from now on, set “Default Mode” to XINPUT in addition to Current Mode, and click Save. Your device will remain in XINPUT mode until you change this setting back to RR App. Your Reality Runner Application will not be able to connect to the device until then.
XInput Mode in the Application
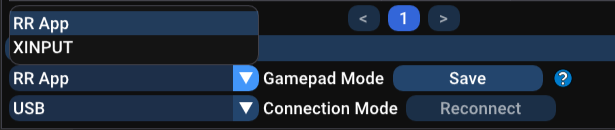
You can also switch to XINPUT mode in the Reality Runner Application. Note that you can only switch Current Mode, which prevents the App from locking itself out from controlling the device.

To do so, navigate to the Sensor Settings Page, scroll to the bottom, and expand the Advanced tab. You can now switch Current Gamepad Mode to XINPUT, and click Save to restart the device.
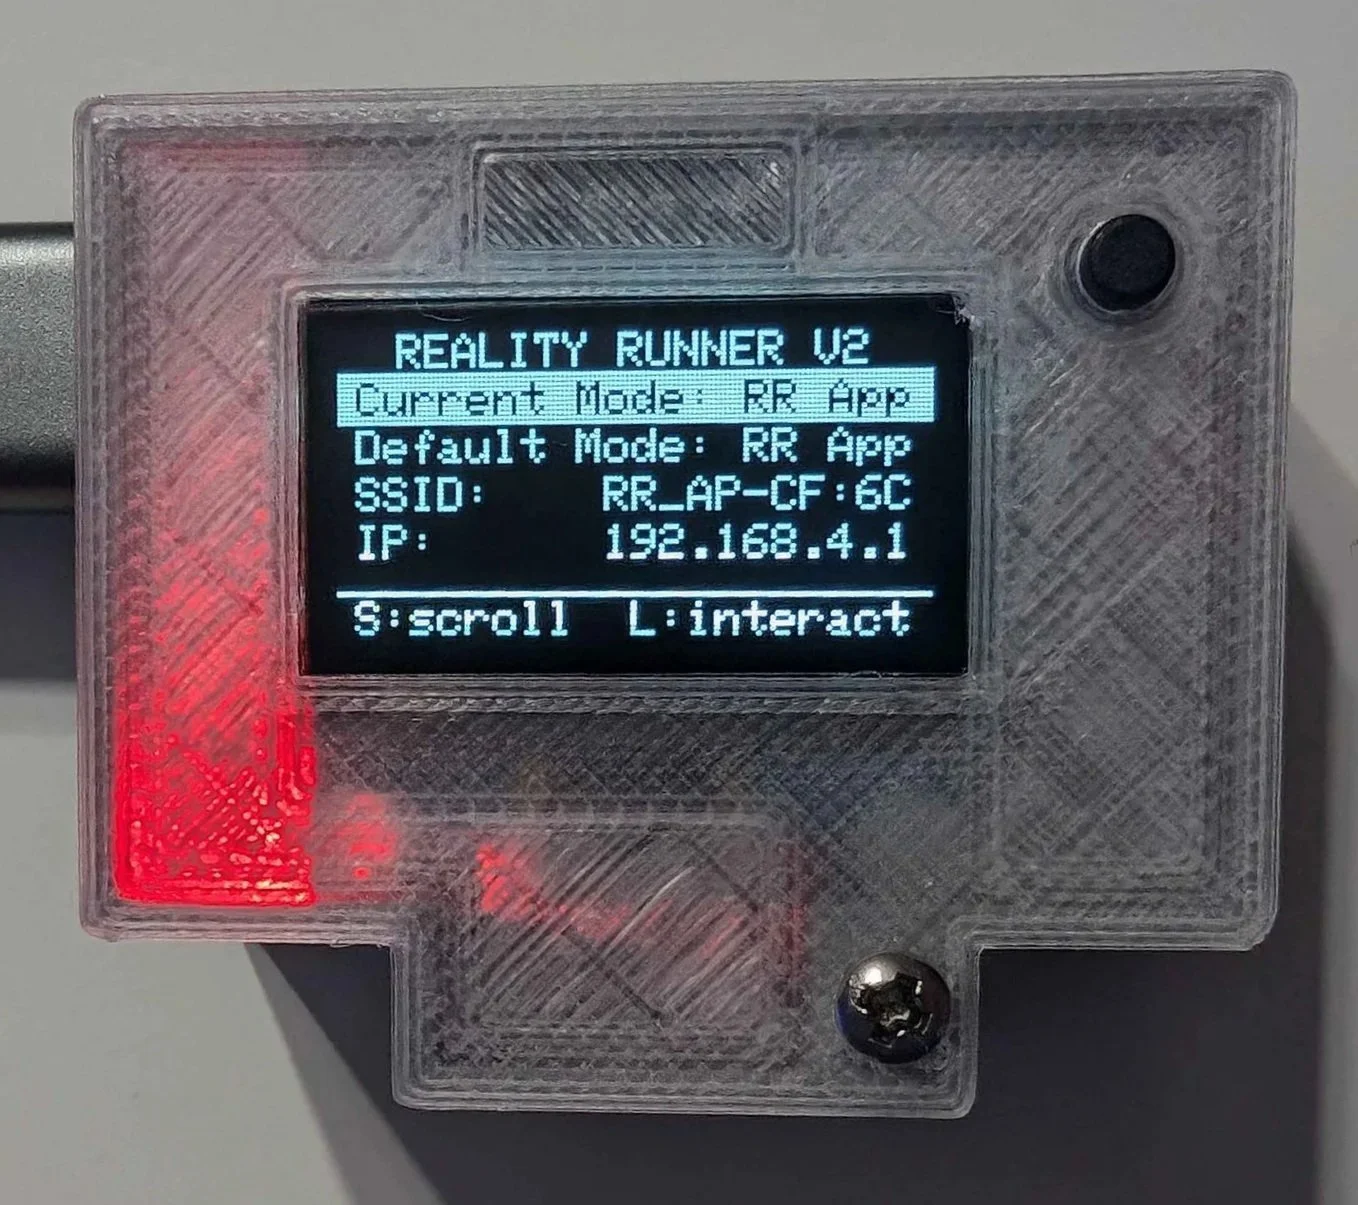
XInput Mode on the OLED Display
If you have a V2 Device, you can view and change some settings directly on your Reality Runner Device using the OLED panel. This includes seeing your device’s IP Address, firmware version, and more. You can also change your Current and Default Gamepad Mode.
There is a single button to the top-right of the OLED panel. Press it briefly to scroll, or long-press to click.
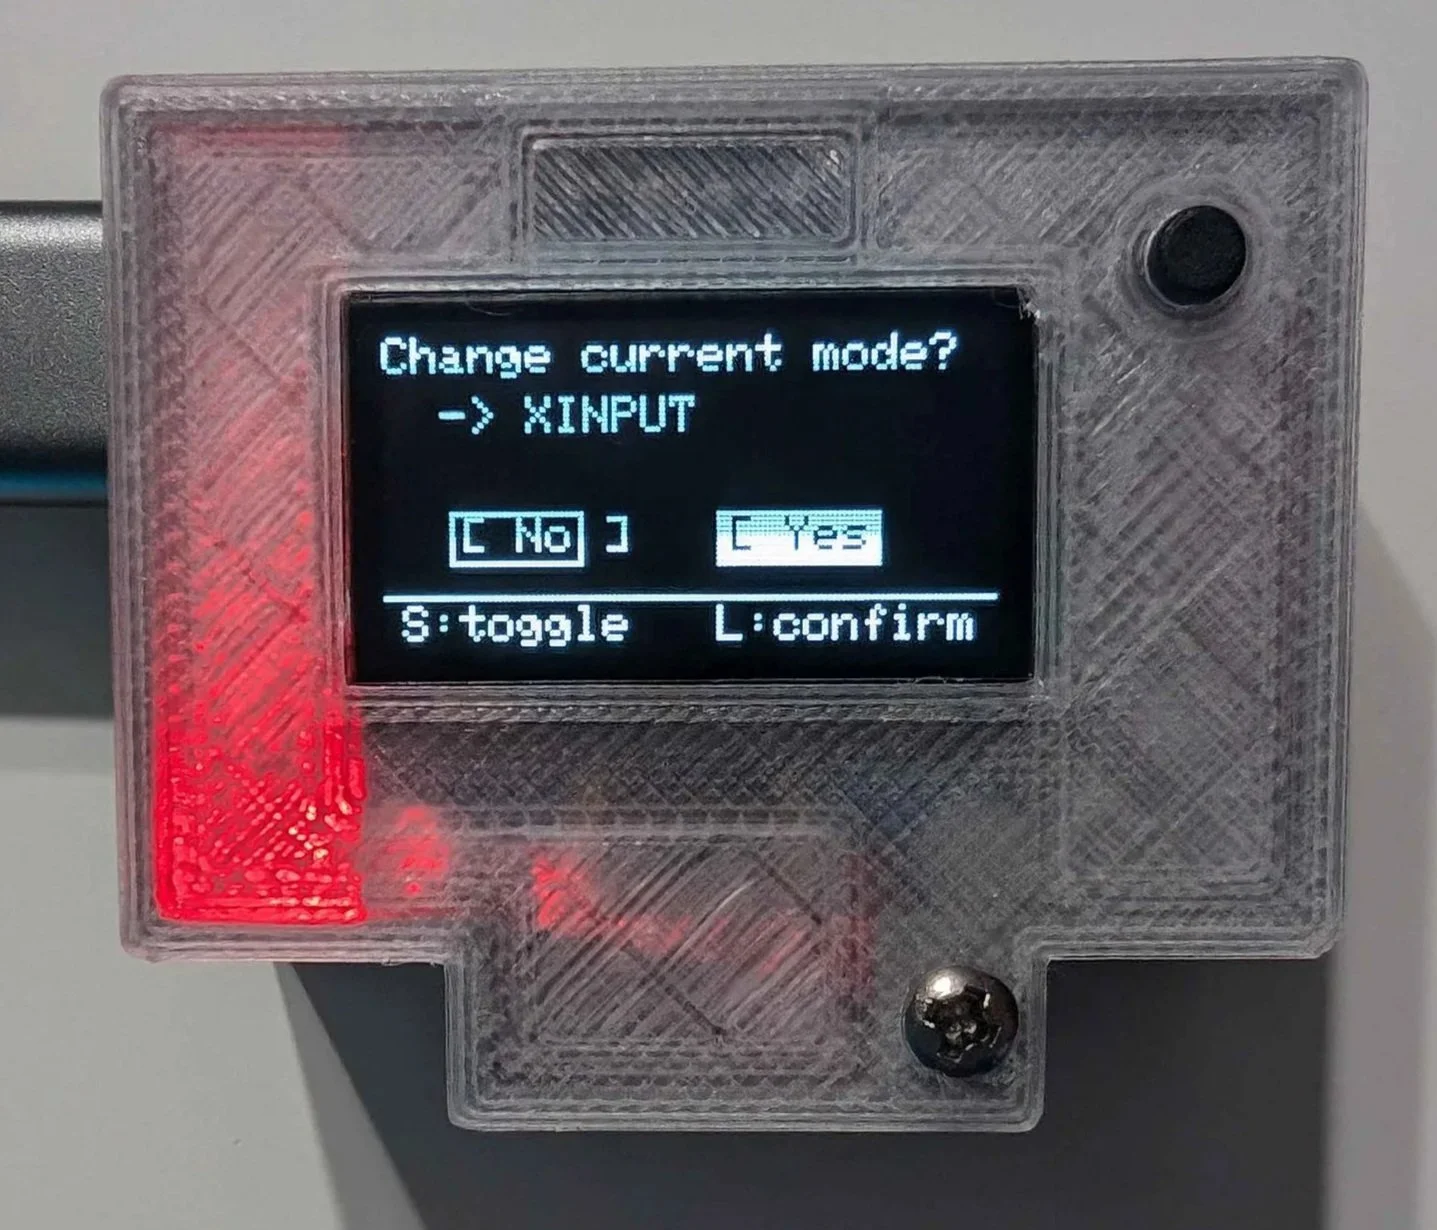
To switch to XINPUT mode for the next boot, scroll to “Current Mode”, and long-press to change the mode. Scroll to “Yes” with a short-press, then long-press to accept. Your device will reboot right away.
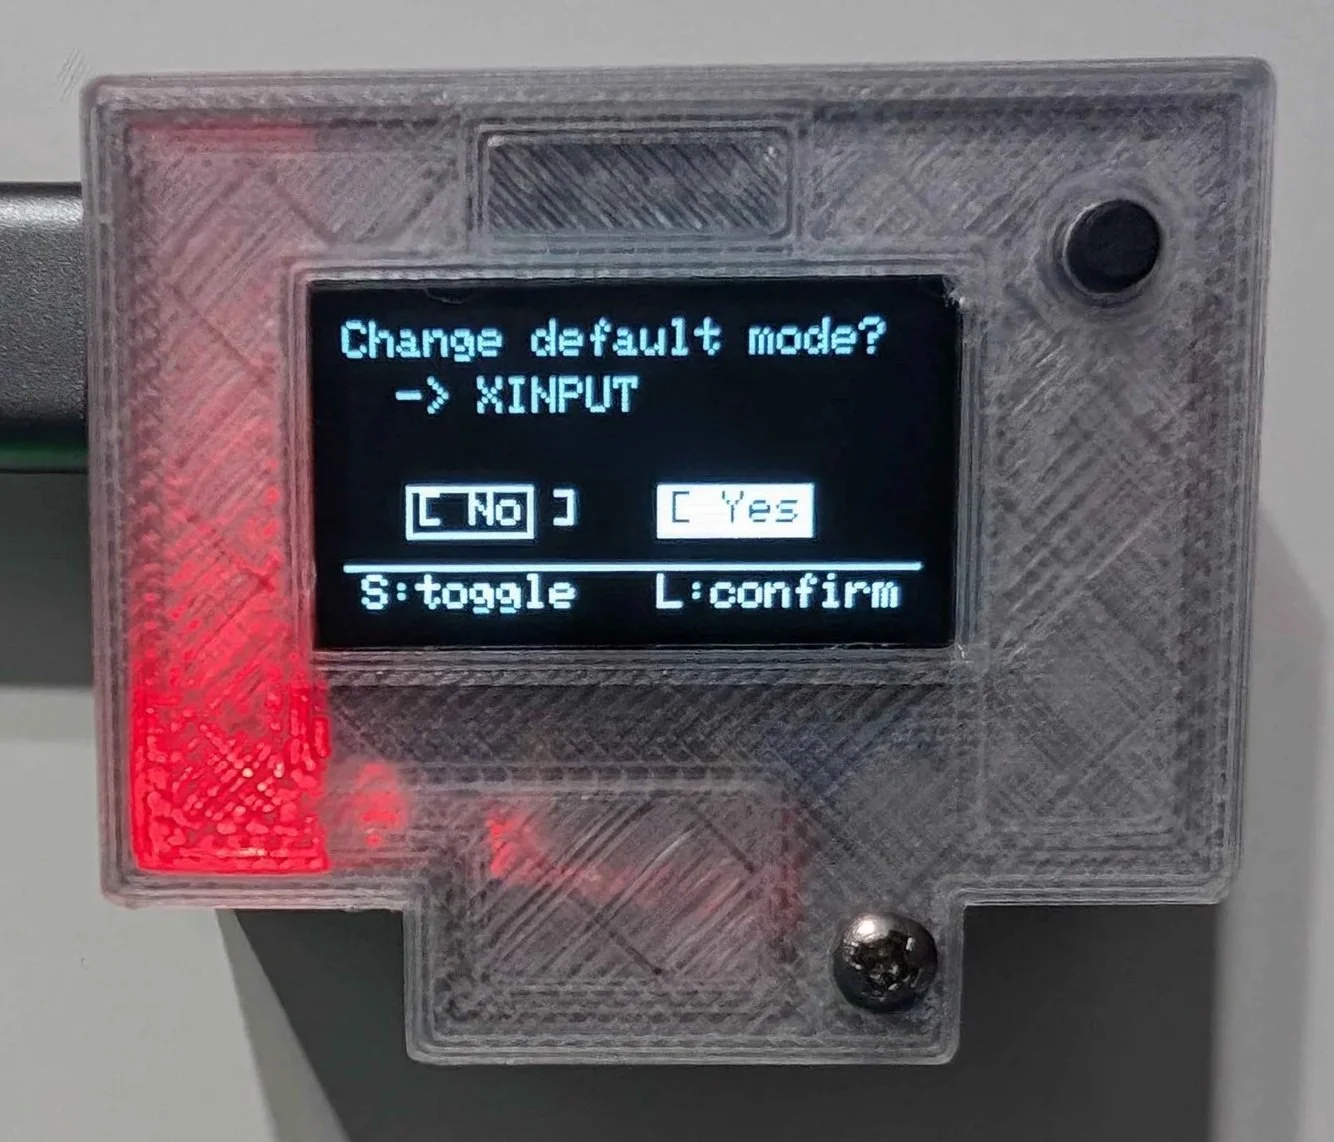
To switch to XINPUT mode from now on, scroll to “Default Mode”, and long-press to change the mode. Scroll to “Yes”, and long-press to accept. Your device will reboot right away. You will need to switch this back to “RR App” in order to use your Reality Runner Application.
Windows Connection
Now that your Reality Runner is booted as an XInput Device, you can connect it to Windows as before (when in RR App mode, you do not need to pair the device).
Navigate to Windows Bluetooth settings (Note: you must connect your sensor via Bluetooth to get a joystick output. WiFi is only for the user interface)
Search for “Reality Runner Treadmill Sensor” or “Input”
Connect
Check connection
You can check the Windows connection via the following:
Navigate to Settings -> Bluetooth & Devices -> Devices
-> More devices & printer settings
Once the new window pops up, right click on the Reality Runner Treadmill Sensor and click Game Controller Settings
Click Properties and view the Test window
Walk on the treadmill and observe the Y-axis move around
Connecting to Steam
Steam should auto recognize and connect to your treadmill sensor. Check the connection by doing the following:
Navigate to Steam -> Settings -> Controller and press Begin Test
Walk on the treadmill and observe the Left axis move around
Using Reality Runner in game
Game compatibility will rely heavily on how the developer made the game. If the game natively supports gamepads and X-input, setup should be immediate or at least easy.
Otherwise, the following video demonstrates how to map in game actions to your Reality Runner joystick. Make sure your game is not blocking gamepad support and Steam input is disabled.
New STEAM settings
As of 12/9/2025, STEAM disabled gamepad drivers by default. In order for your Reality Runner to work with STEAM vr/input you need to re-enable the gamepad driver in your steam settings: Settings > Startup/Shutdown? Manage Add-Ons
