
Reality Runner SteamVR Driver & App
Reality Runner offers SteamVR support with an OpenVR driver, and a corresponding control app.
The Reality Runner SteamVR driver operates by overwriting the joystick values of your controller, meaning that it adds wide support for most games.
We also offer a “Virtual Gamepad” mode, where the Reality Runner is merged with a real Gamepad, and the Gamepad is hidden from games. This allows you to play Flat2VR mods that require gamepad input, or even pure flatscreen games. Xbox and Playstation controllers are supported.
The Reality Runner app interfaces with the driver, and your device to provide control settings for both.
This guide will walk you through the process of installing and using the Reality Runner SteamVR Driver & App.
Preparing Your Device
In order to use the Reality Runner App, you first need to update your device firmware. Navigate to rrsensor.local, and press “Update” to update your firmware to the latest version (v3.1.0 or later).
Bluetooth connectivity
Do not connect your Reality Runner to windows via the bluetooth pairing menu. The Reality Runner App will scan and pair with your Reality Runner independently when you launch the application. If you do pair via windows, navigate to the bluetooth device menu and select “Remove Device”.
Installation
Download instructions can be found here.
Once you have downloaded the installer, close SteamVR, and the Reality Runner app, if you have installed it previously. Run the installer.
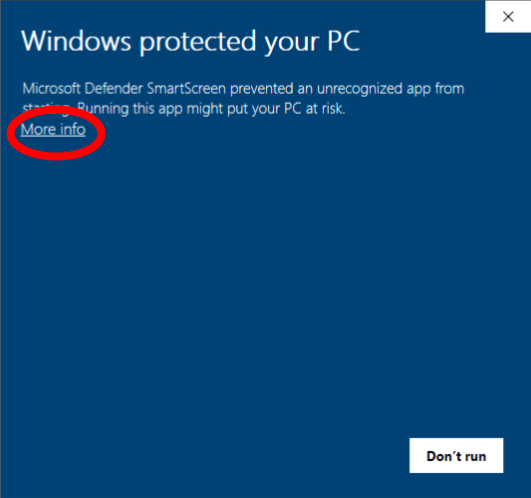
You will see a warning from Windows Defender. Click “More Info” and then “Run Anyway”. You will then be walked through the installation process.
Your SteamVR folder should be detected automatically, but if SteamVR is not on your C:\ drive, make sure the driver is installed to your SteamVR drivers folder.

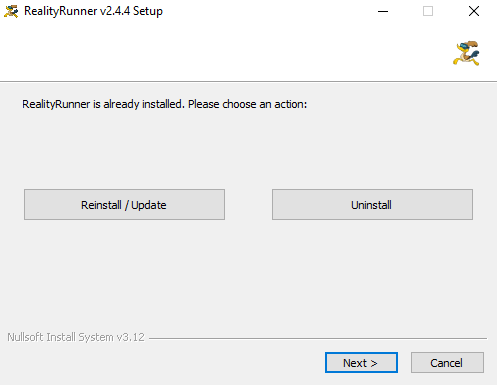
You can uninstall and reinstall the app at any time. If you want to run games with aggressive anti-cheat, we recommend uninstalling the app by running the installer, and selecting the “Uninstall” option. You will need to close SteamVR and the RealityRunner app before uninstalling. Don’t worry, all of your previous settings will be saved when you re-install.
Running the Driver
Once the driver is installed, it will launch automatically when you run SteamVR. The driver will not run unless you are also running the RealityRunner App. The RealityRunner device will show up as disconnected if the app is not running.

Reality Runner App not running
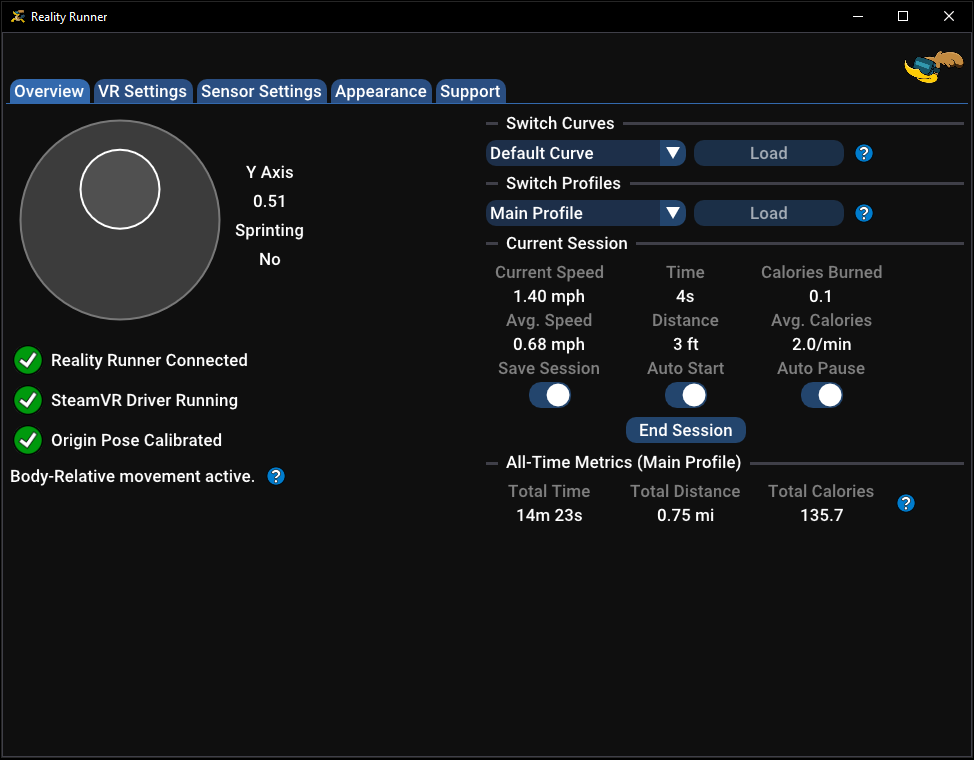
Reality Runner App is running
Using the App
When you want to use your RealityRunner sensor with SteamVR integration, launch the RealityRunner App. You should be able to launch it from your desktop, or from the Windows Search bar.
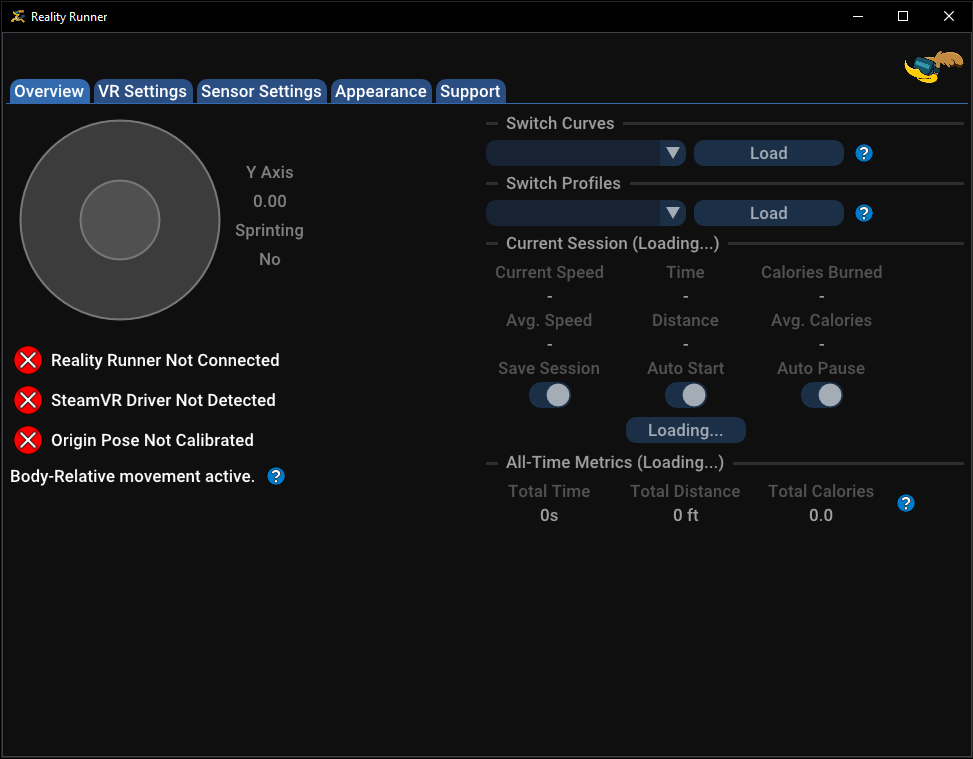
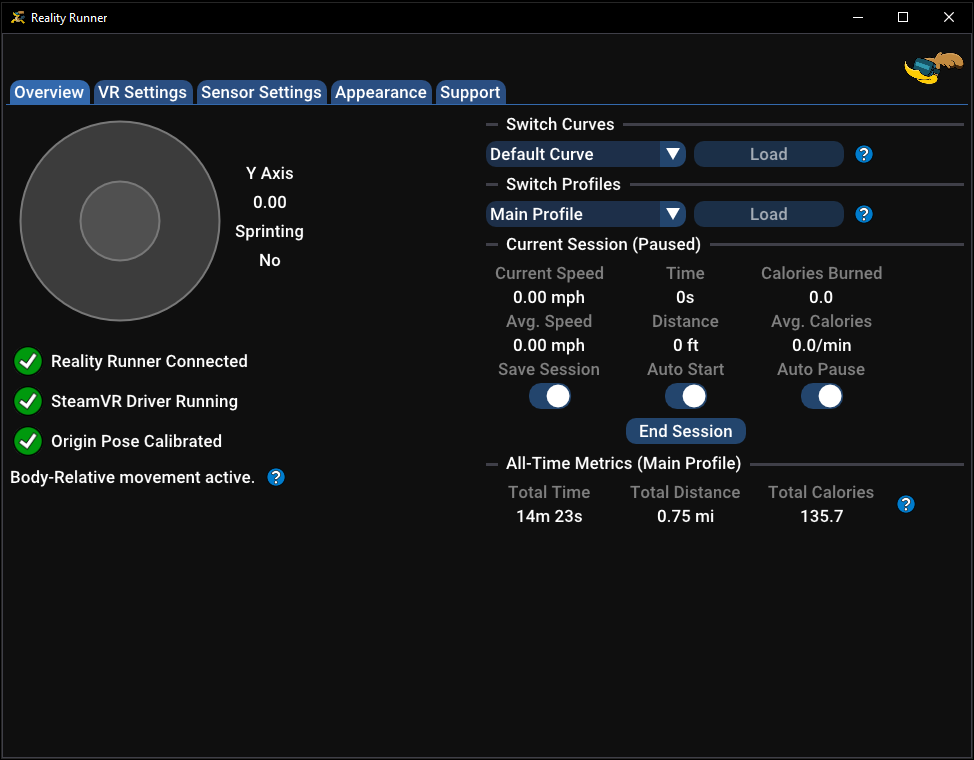
Once the app launches, you’ll see status indicators on the Overview page. If all of the indicators are green, your RealityRunner should be hooked into SteamVR. If any aren’t green, mouse-over them for tips on how to troubleshoot.
With the app running and your sensor installed, simply walk on your treadmill and your character will move in-game. In the SteamVR home, you should see your joystick moving when you walk on the treadmill.
On the Overview Page, you’ll also see Quick Settings on the right-hand panel. These allow you to quickly switch curves or profiles, and record Fitness Sessions. You can also see your All-Time Fitness Metrics for the selected profile. These same settings are also available on the Sensor Settings page, with many more customization options available.
In-App Updates
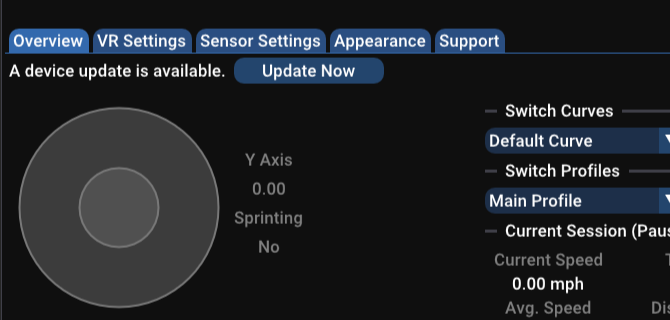
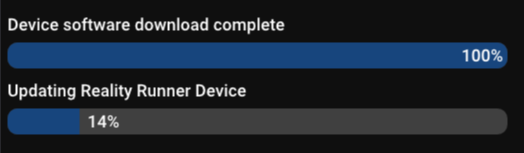
If a device update is available, you can either update by going to rrsensor.local, or by clicking on the prompt in the app. Your device will need to be on at least version 3.1.2 in order to update in-app. Otherwise, you will be shown a button to open rrsensor.local and update through the web app.
In-app updates should take around 2 minutes.
VR Settings
Navigate to the VR Settings page to configure the Reality Runner Application and Driver. These settings are saved in between app launches, and even if you uninstall and reinstall the app and driver.
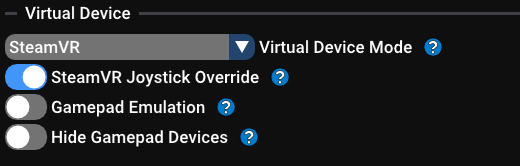
First, choose your Virtual Device Mode, between SteamVR and Virtual Gamepad.
SteamVR: simply overlays your Reality Runner’s virtual joystick input onto your VR motion controllers. This is the most seamless way to play your games with Reality Runner.
Virtual Gamepad: Hides all the connected gamepad inputs from your game and merges them into a single virtual Xbox controller. This is great for games that don’t like dual inputs and require you to use a gamepad in addition to your Reality Runner sensor (Cyberpunk). Supports Xbox or Playstation Controllers.
Custom: Need something in between? Customize the behavior with the Virtual Device Setting sliders.
These “Virtual Device” settings are:
SteamVR Joystick Override: overlays your Reality Runner’s virtual joystick input onto your VR motion controllers. This is the most seamless way to play your games with Reality Runner.
Gamepad Emulation: Creates a virtual gamepad with your Reality Runner sensor input overlaid, combining multiple inputs from Xbox and Playstation controllers.
Hide Gamepad Devices: Hides the native input from any connected Xbox or Playstation controllers.
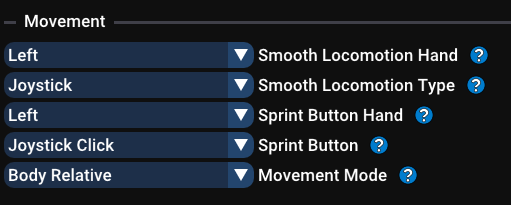
If you are running SteamVR, you will have access to Movement settings.
Treadmill Height Offset: This adjusts your height in VR and can help to counteract your in-game body being too tall when you are standing on your treadmill.
Smooth Locomotion Hand: This can be used to select between moving the joystick on your left or right hand when you walk on the treadmill. This feature may be useful for left-handed players that swap their hands in-game.
Smooth Locomotion Type: This can be used to select joystick vs. trackpad based locomotion. This is primarily for use with trackpad-only headsets like the HTC Vive, though it could also be useful for the Valve Index as well.
Sprint Button Hand: This is used to select whether your selected sprint button is on your left or right hand.
Sprint Button: This is used to select which button you have bound to sprint in-game. If you’re not sure, choose “Joystick Click”. Note that this is not the same as the sprint button selection in the device’s web portal (rrsensor.local), which is ignored while using the SteamVR driver.
Movement Mode: This is used to select between “Body Relative” and “Native” movement, which are explained in the “Movement Settings” section below.
Movement Settings
The Reality Runner App features three movement modes: “Native”, “Joystick Directional”, and “BodyRelative”.
Native: In this mode, when you walk on the treadmill, your joystick will move forward. If you use hand-relative movement in-game, you should use Native mode.
Joystick Directional: While in this mode, you will have to use both your joystick and your treadmill to move. Point the joystick in the direction you want to move, and then walk on the treadmill to set your movement speed.
Body Relative: This mode corrects for where you are looking relative to the treadmill, so that your in-game character always moves in the direction you are actually walking on the treadmill. This allows you to look around freely while walking, just like walking in real life.
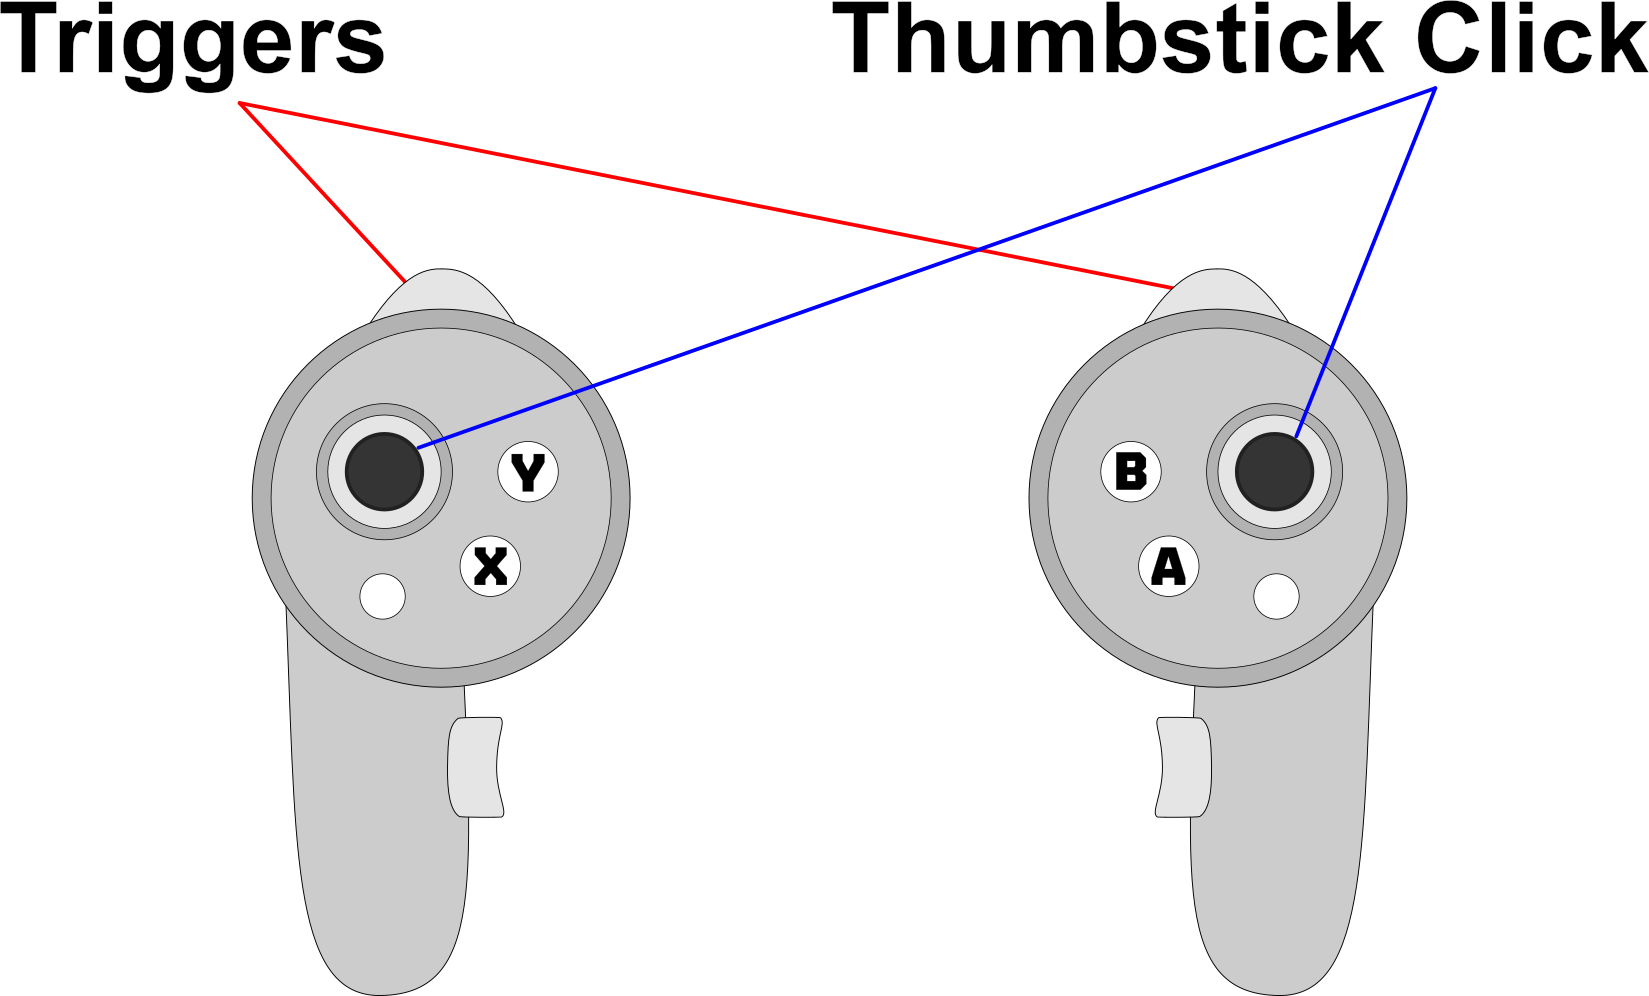
Body Relative Movement is enabled by default, but before it is calibrated, the app will operate in Native mode. In order to calibrate Body Relative Movement, stand on your treadmill, and look straight ahead. Press both Triggers, and both Thumbstick buttons at the same time. If you reset your VR playspace, you’ll need to do this calibration again.
If SteamVR is running while you are in Virtual Gamepad mode, you can calibrate either by pressing the triggers and thumbsticks on your VR controllers, or on your Gamepad.
The Reality Runner App blends your real joystick movements with the virtual joystick movements from the treadmill. This means you can combine inputs as you like. For example, you can walk on the treadmill, while holding left or right on the joystick, to move in a diagonal.
Advanced Movement Settings
We offer a few additional movement settings for advanced users, which can be found at the bottom of the VR Settings Page. We recommend only turning these on once you have mastered Reality Runner.
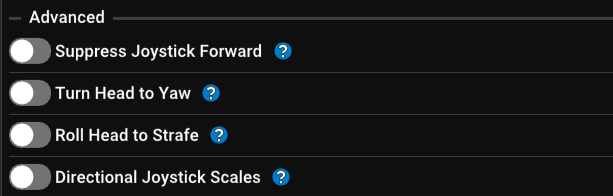
Suppress Joystick Forward: If this setting is enabled, your physical joystick’s Y axis will be disabled, meaning that you can only move forward or backward by walking on the treadmill. This feature is not compatible with Joystick Directional Movement.
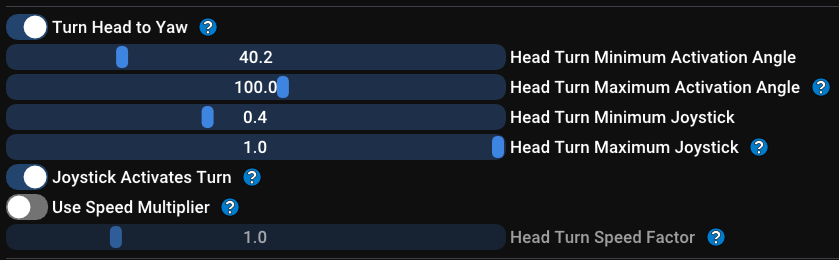
Turn Head to Yaw: If this setting is enabled, you can turn yaw in-game by turning your head past a threshold (“Head Turn Minimum Activation Angle”). When your head is turned to “Head Turn Minimum Activation Angle”, your joystick value will be set to “Head Turn Minimum Joystick”. When your head is turned past “Head Turn Maximum Activation Angle”, your joystick value will be set to “Head Turn Maximum Joystick”. In between, your joystick value is blended smoothly between the minimum and maximum value based on your head turn angle.
Most games have an internal dead zone, which is often ranges between 0.1 and 0.6. We recommend setting “Head Turn Minimum Joystick” to just below the in-game dead-zone for the best experience.
Joystick Activates Turn is an optional mode within Turn Head to Yaw. If activated, you will not be able to yaw your in-game character using the physical joystick. Instead, deflect the physical joystick to activate Turn Head to Yaw, allowing you to look around freely with Body Relative Movement while you are not deflecting the joystick.
Speed Multiplier multiplies your Turn Head to Yaw value by a multiplier, based on your treadmill speed. If you are walking at full speed (a forward joystick of 1.0), your Turn Head to Yaw value will exactly equal the Turn Head to Yaw value with this setting disabled. If you are walking slower than full speed, you will turn more slowly. This allows you to look around while standing still, and to turn faster using your head based on your walking speed.
Head Turn Speed Factor increases or decreases the effect of the speed multiplier, using an exponential scale. At a value of 0.5, you will be able to use Turn Head to Yaw while walking at any speed. At a value of 1.5, you will need to be walking close to your maximum speed before Turn Head to Yaw achieves a significant turning speed.

Roll Head to Strafe: If this setting is active, you can tilt your head let and right to strafe left and right in-game. At the Minimum Activation Angle, your joystick X axis will be set to 0. At the Maximum Activation Angle, your joystick X axis will be set to 1. The value increases smoothly in between.

Directional Joystick Scales: If this setting is active, the X and Y axes of your movement are scaled by a customizable multiplier. This is mainly useful for games that scale X and Y speeds differently, such as VR Chat.
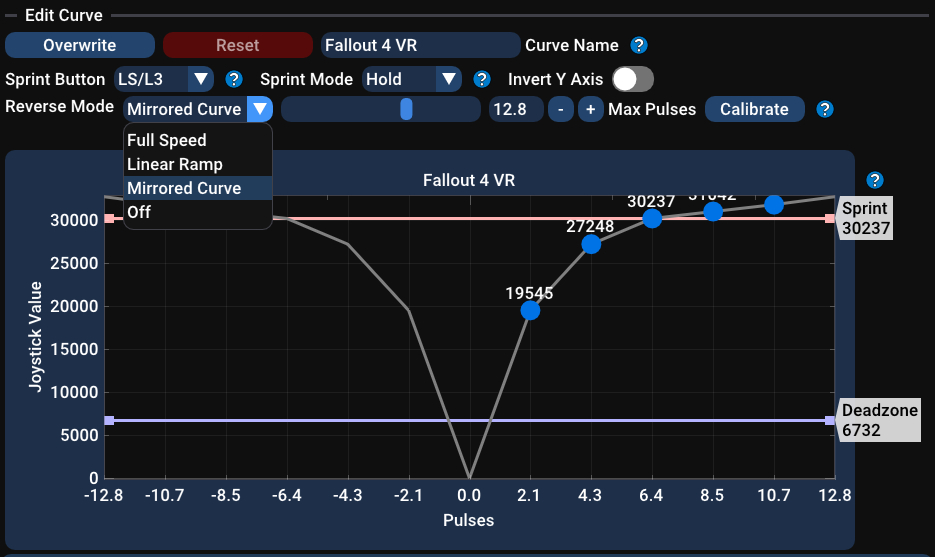
Sensor Settings: Curves
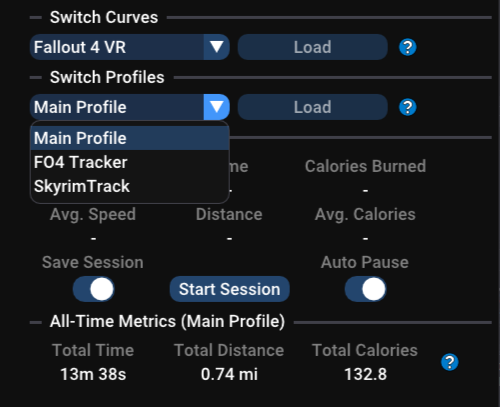
The Switch Curves Dropdown allows you to choose a curve for a specific game. Once you’ve selected one, click Load to apply the changes to your device. You can also Delete curves, Share them with other Reality Runner users, or Import to use someone else’s curve. You’ll find a good number of curves in the Reality Runner Discord.
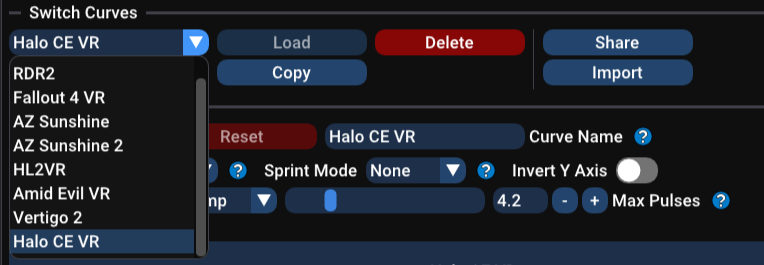
The Edit Curve section allows you to customize the curve to a specific game. You can set the Curve Name, Sprint Button and Hold-to-Sprint vs. Toggle-Sprint, and invert your joystick’s Y axis. You can also choose your maximum pulses, which is essentially the treadmill speed at which your joystick will max out. You can find more information about these settings in the Sensor Calibration Page.
Note that Sprint Button is only used if you are using your device in Virtual Gamepad mode or XINPUT mode. If you want to customize your sprint button inside of SteamVR, go to the VR Settings page.
You can also select a Reverse Mode for your curve, on V2 devices only.
Off will disable backwards movement.
Full Speed will immediately max out your joystick value as soon as you start walking backwards.
Linear Ramp will have a constantly increasing backwards speed, up to your max pulses.
Mirrored Curve will copy your curve values from forwards movement in the reverse direction.
Below these settings you’ll find a graph where you can actually edit your curve values. The X axis is your speed on the physical treadmill. The Y axis is your in-game joystick value, which is essentially your in-game movement speed.
To make a curve, your goal is to shift the blue points until your real-world speed matches your in-game speed.
The horizontal “Sprint” line represents at what joystick value your in-game sprint will activate. The horizontal “Deadzone” line represents the minimum joystick value sent to the game, if any treadmill movement is detected. Think of it like a “fast-start” setting, to reduce input delay as you start walking.
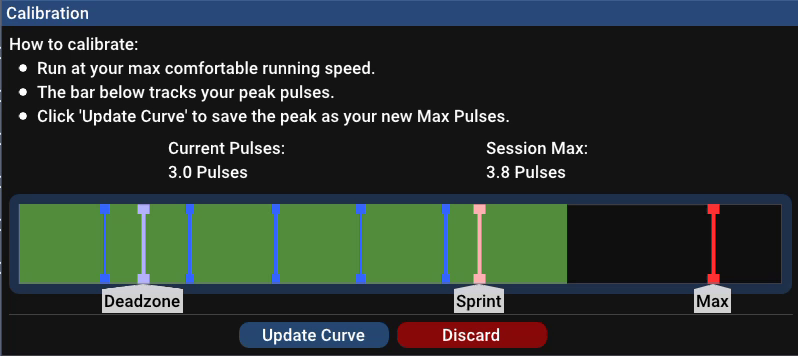
If you want to calibrate your Max Pulses for the current curve, press the Calibrate button. A popup will open showing the current device speed measurement, known as “Current Pulses”. Run at your maximum comfortable running speed, which will be displayed with the red “Max” line. Click “Update Curve” to change your curve’s Max Pulses to this new value.
Profile Settings
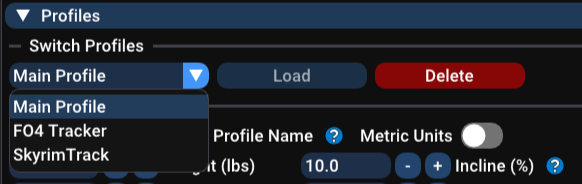
The Switch Profiles Dropdown allows you to choose a profile for a specific user or use case. Once you’ve selected one, click “Load” to apply the changes to your device. You can also Delete profiles here.
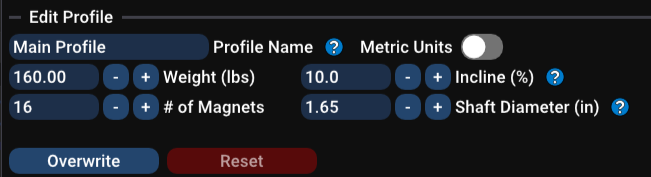
The Edit Profile settings allow you to modify a profile or make a new one. You can change your profile name, set the weight of your user, and set the incline and shaft diameter of your treadmill. You can also specify the number of magnets on your magnet ring. If you ordered a V2 device through our shop with the magnet ring, this will be 16.
These settings are used in your fitness tracking, to estimate distance and speed traveled, and calories burned. More information about these settings can be found on the Sensor Calibration Page.
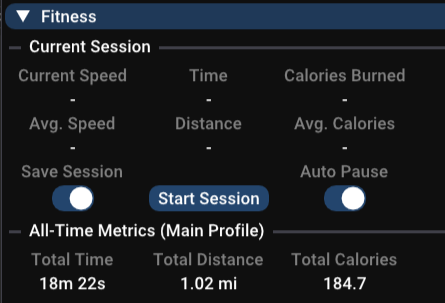
Fitness Tracking
The fitness section allows you to record Fitness sessions, and view your all-time fitness metrics. If you turn on Save Session, then your session will be saved when you end it, otherwise it will be discarded. Auto pause will pause the timer and your speed measurement when the treadmill is not moving.
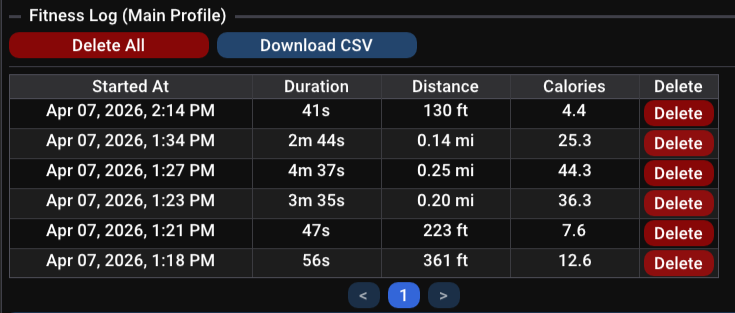
The Fitness Log shows the history of fitness activity for your current profile. You can delete individual sessions or all of your sessions, alternatively you can download your fitness log as a CSV file (viewable in Excel). If there are multiple pages, you can use the arrows at the bottom to navigate to older entries.
Advanced Settings
At the bottom of the Sensor Settings page, you can access Advanced settings that can be accessed by clicking on the separator. You shouldn’t need these settings for most use cases.

Gamepad Mode allows you to switch your Reality Runner Device’s Boot Mode between “Application” Mode and “XINPUT” mode.
Application mode (“RR App”) is our normal mode of operation, which allows the sensor to connect to the Reality Runner App. When in this mode, it will not show up as an Xbox controller in games without running Virtual Gamepad Mode.
XINPUT mode is the legacy mode of operation, where the Reality Runner emulates an Xbox controller. This is mostly redundant with the Virtual Gamepad mode. But it is less likely to trigger anti-cheat, so this is maintained as a legacy feature. Once you change the Bootmode to XINPUT, the app will no longer be able to connect. As long as you don’t change the default Boot Mode in the Web UI (rrsensor.local), the device will return to “"RR App” Mode and reconnect with the app when it reboots a second time.
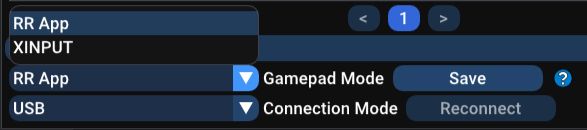
Connection Mode allows you to switch between connecting to your device over Bluetooth or over USB. You can only use this in RR App Mode. USB is only supported for V2 Devices.

Appearance

By default, the Reality Runner app is set to a dark theme. If you prefer light mode, or want to use Holiday themes, navigate to the Appearance page. If you set your theme to “Automatic”, the app will switch holiday themes automatically based on the time of year.
Support
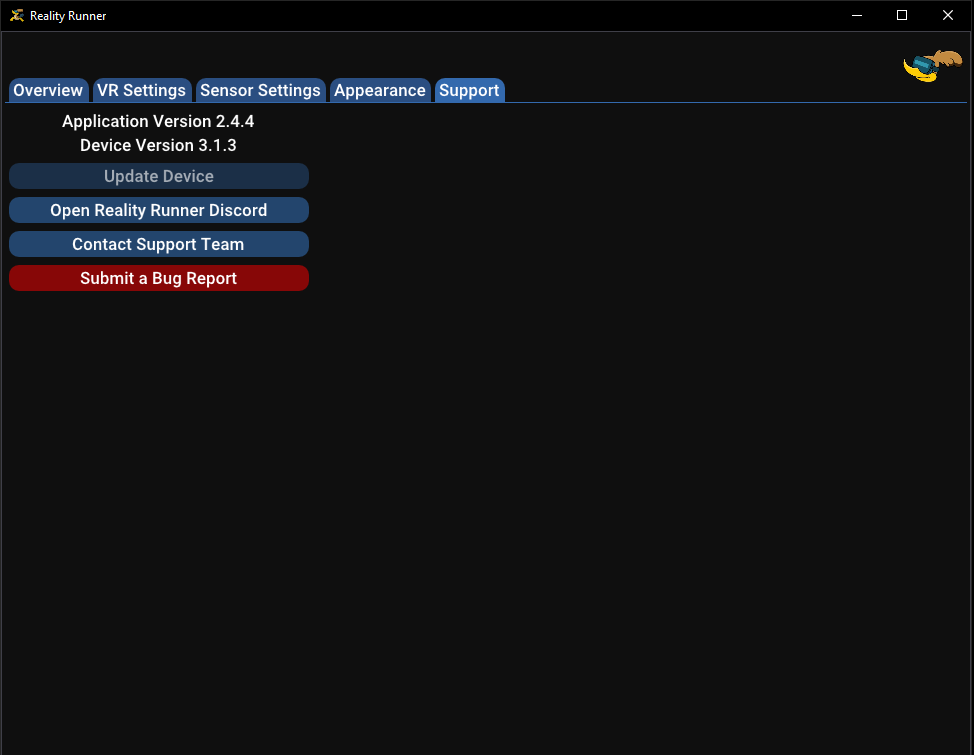
If you experience any issues while using the Reality Runner Driver & App, please submit a bug report. Navigate to the Support page, and click “Submit a Bug Report”. The app will automatically generate a zip file, and open our bug reporting page. Please upload the zip file, and describe your issue in detail. Additionally, please provide either your email or your Discord username so that we can contact you for more information, and help to resolve the issue. Then, click Submit.
The support page also tells you what software version your Application and SteamVR Driver are on, and what software version your device is on. These are both useful for the devs if you’re experiencing bugs.
Anti-Cheat
The SteamVR driver is designed to offer a seamless Reality Runner experience for users, but it could be detected by aggressive anti-cheat systems. If you want to play a game that is known for extensive anti-cheat detection, we strongly recommend uninstalling the driver and app before doing so. Simply run the installer again to uninstall. The install process is very fast, and your configs will be saved. For multiplayer and heavy anti-cheat games, your Reality Runner may still be used in XINPUT mode as a generic game controller.