
Sensor Calibration & User Interface
The Reality Runner Treadmill Sensor has a two-step calibration process. Our Web UI and App will guide you through both steps:
Coarse calibration: Measure your Max Pulses using our Pulse Detector. This counts the number of magnetic pulses that correspond to your real-life movement speed.
Fine calibration: Our Curve Editor gives you full control over how fast or slow you move in-game. You can fine-tune your movement speed however you like, and even save multiple curves for different games.
You can interact with your Reality Runner using our desktop app or our built-in web UI. These UIs offer additional features such as firmware updates, fitness tracking, sprint button configuration, and much more.
This guide will walk you through each feature accessible through the Web UI.

Accessing the Web UI
Once your treadmill and sensor are set up and you’ve successfully paired the sensor to your device, navigate to the user interface via the following:
If you are setting up for the first time, or your Reality Runner is in Hotspot mode, it will broadcast the below setup network:
SSID:
Devices without a screen:RealityRunnerAP-##:##
Devices with a screen:RR_AP-##:##
PASS: RoadRunner
Web Address/URL:
192.168.4.1
http://rrsensor.local/
If you have connected your Reality Runner to your Home Wi-Fi network, you should be able to reach it at the below address:
If that address is not loading, newer Reality Runner devices have a built-in screen that displays its IP address. You can enter that IP address in your browser URL bar to visit the Web UI.
For devices without a screen, you may need to open your home Wi-Fi router’s admin page to find your Reality Runner’s IP address.
Once connected to the user interface, navigate to the “Treadmill Calibration” section. This is the “coarse calibration” which allows you to tailor the sensor behavior to a comfortable movement speed. To calibrate:
Press “Start“
Begin moving on the treadmill at your fastest speed while maintaining comfort and safety.
You will see two things while using this mode:
“Pulses” will increase with your speed. The sensor uses this to determine how fast you are going. Once you have reached your maximum speed, press Copy to update the sensor settings. Make sure to press save below when complete
Below the Pulse measurement, you’ll see a representation of a joystick moving. This can be used to visualize the correlation between your speed and theoretical joystick movement.
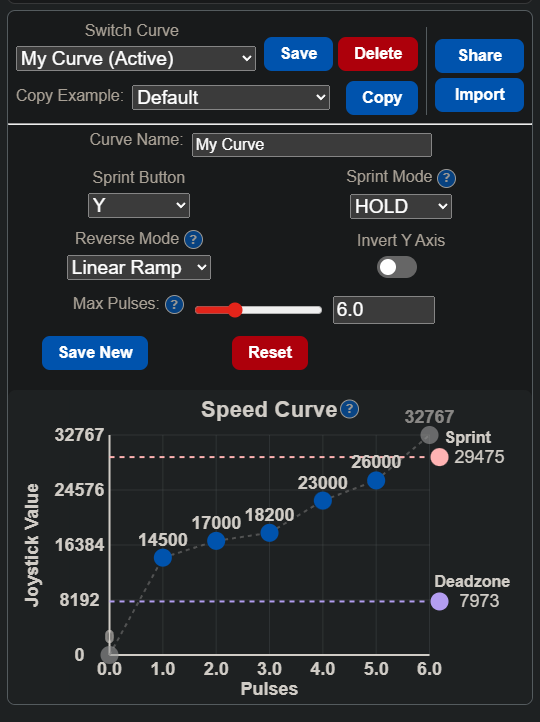
Fine calibration
After completing the previous steps, you have the option to fine tune sensor settings to your liking. Changing any of the settings and pressing Save will update the sensor. Reset will undo any changes you’ve made.
Curve Name lets you change the name of the current settings profile.
Sprint Mode determines the behavior done to Sprint Button when your Sprint threshold has been reached.
None does nothing, no sprint behavior will be seen.
Hold will press and hold the Sprint Button.
Toggle will press the SprintButton once whenever the Sprint threshold is reached.
Reverse Mode is available for Reality Runner V2 users, this allows you to select between a few predefined options for your reverse speed curve: Linear Ramp, Full Speed, and Mirrored which inverts your forward curve.
Invert Y Axis will flip the direction the joystick moves.
Joystick Deadzone configures the minimum joystick value your sensor will send.
Max Pulses is set via the coarse calibration, but configurable here too. This sets you max comfortable running speed.
Save New will save a new curve profile with the current settings and Curve Name.
Curve editor
The Speed Curve allows you to fully customize your Reality Runner’s joystick characteristics by editing the speed curve. This allows you to control exactly how fast you move in game when walking different speeds. This is also where you can adjust your Deadzone and Sprint threshold. Don’t forget to press Save!
Example Curves provide a starting point for your curve customization. Press Copy to load an example and begin customizing!
Share and Import allow you and others to share curves for different settings. Since each game may be developed with a different speed curve, we’ve built it so you can save as many as you’d like!
Fitness logs
The Reality Runner treadmill sensor has multiple ways to view fitness and activity information:
The Current Session window displays data pertaining to your current play session including speed, calories burned, distance traveled and more. Press “Start Session” to start tracking.
The All-Time Metrics windows shows your total saved playtime and fitness metrics using the sensor.
The Activity Log saves previous session data, allowing you to view and export your metrics from previous sessions.
Profiles
The Profiles card allows you to program settings specific to you and your treadmill which will be used to calculate your fitness metrics. You can switch between profiles and save as many as you’d like.

Incline is the slope of your treadmill, press the (?) to learn calculate it!
# of Magnets is the quantity of magnets on your magnet ring
Shaft Diameter is the rod that your treadmill belt revolves around. Click the (?) to learn how to measure
Internet Settings
The Reality Runner user interface requires your device to be connected to the same network. To do this there are two options:
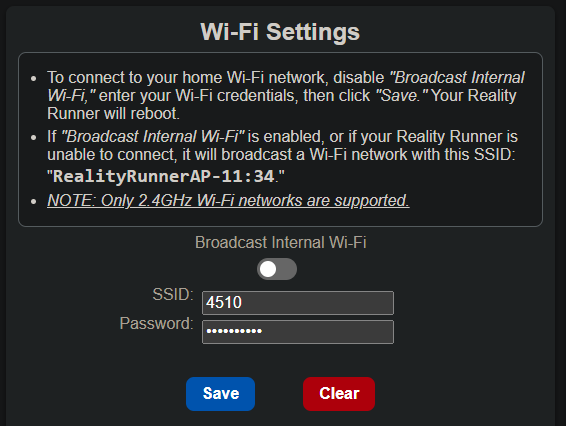
Broadcast Internal Wi-Fi configures the sensor to host it’s own network which you can connect to:
SSID: RealityRunnerAP-##:##
Pass: RoadRunner
Connect to your local WiFi network. This requires you input your WiFi’s SSID and Password. Clicking “Save” will update the sensor’s WiFi configuration.
Clear will erase your WiFi SSID and Password from the sensor’s settings and revert back to the RealityRunnerAP-##:## network
Firmware updates
Over-the-air updates will occasionally be available as we add new features and resolve issues. When an update is available the Firmware Update window will notify you and give you an option to update.

Switching to XInput Mode
As of Firmware update 3.0.0, your Reality Runner Device will boot into Reality Runner Application (“RR App”) Mode by default. If you want to it to boot into XINPUT mode just once (and then go back to RR App Mode on the next restart), you need to set your Current Gamepad Mode to XINPUT. If you want it to boot into XINPUT mode by default each time, you should also set your Default Gamepad Mode to XINPUT.
There are 3 different ways to do this; in the Web UI, in the Reality Runner Application, or using the V2 OLED Screen. Default mode can only be changed via the Web UI and V2 OLED screen.
XInput Mode in the WebUI
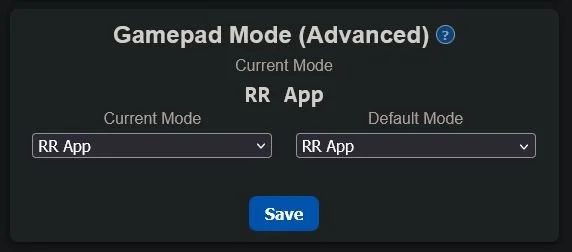
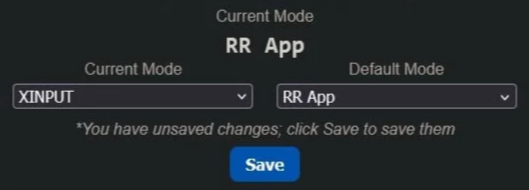
The best place to change your Gamepad Mode is in the Web UI (rrsensor.local). To do so, scroll to the bottom, where you’ll see a “Gamepad Mode (Advanced)” section.
To boot into XINPUT mode once, set “Current Mode” to XINPUT, and click Save. The second time you restart your device, it will return to RR App Mode, and your Reality Runner Application will once again connect to the device.
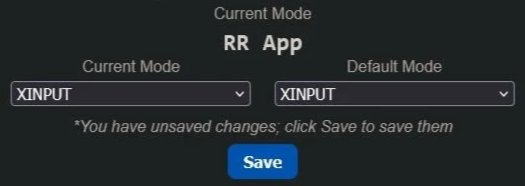
To boot into XINPUT mode from now on, set “Default Mode” to XINPUT in addition to Current Mode, and click Save. Your device will remain in XINPUT mode until you change this setting back to RR App. Your Reality Runner Application will not be able to connect to the device until then.
Backup & Restore
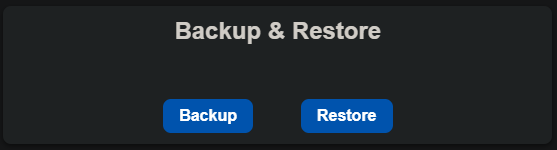
The Backup & Restore functionality in the Web UI let’s you save a copy of your data from the device for later use.
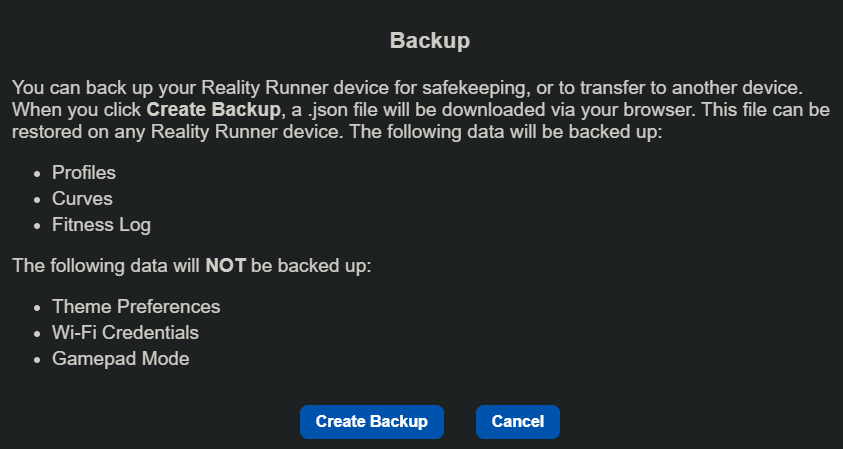
When creating a backup a JSON file will be saved to your device with data from your Profiles, Curves, and Fitness Log
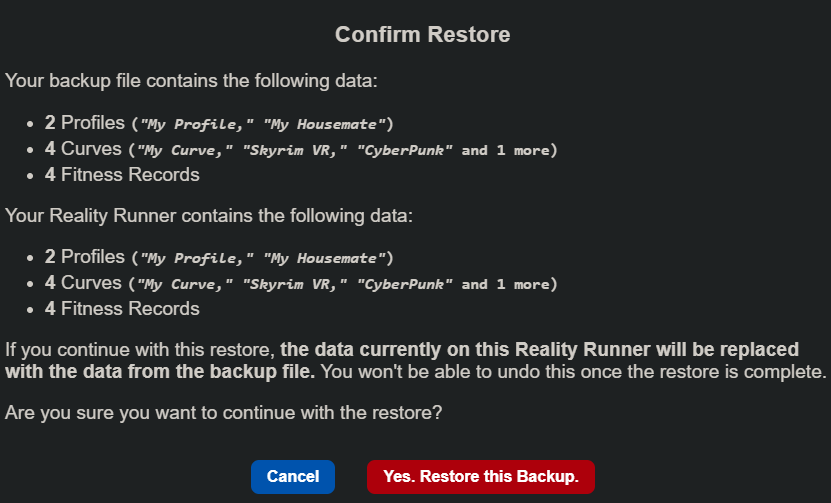
Before restoring, the Web UI will summarize what it found in your JSON and prompt you to continue.